A Very Bright Idea in Portable Lighting

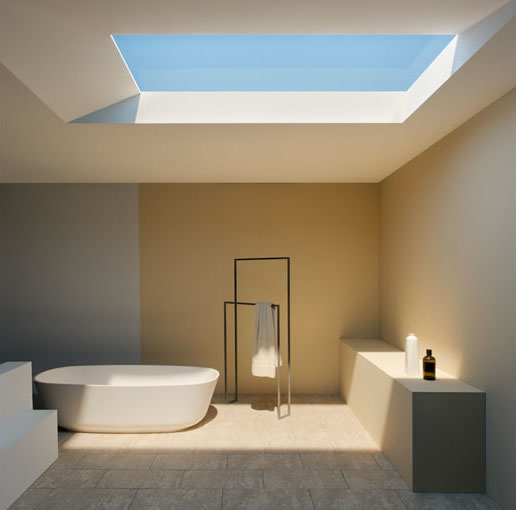
A couple years ago, we featured a prototype lighting system made by Voltaic Systems that was installed in the LifeEdited apartment. The light featured a CNC machined aluminum body and a bright, adjustable LED bulb. Since Voltaic’s main business is portable solar charging systems, the dangling light was connected to a ceiling receptacle that was connected to battery packs stored in a cabinet. Those batteries were connected to a small array of photovoltaic panels installed right outside one of the apartment’s windows (the batteries could also charge portable devices). While making a nifty and functional light for the apartment, the lighting system was ultimately designed to be a versatile light source that could be used and charged in any conditions.

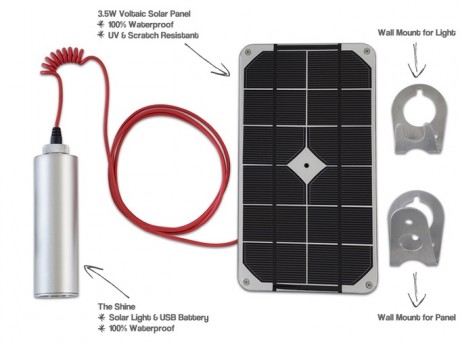
For the last few years Voltaic Systems has been tweaking and refining the design and now they have launched a Kickstarter campaign to fund production. Dubbed Shine, the new system retains an adjustable LED bulb and sleek aluminum construction. Unlike the prototype, the production unit is 100% waterproof and its battery is stored inside the shaft. The battery can be charged via USB or an 8.27” x 4.45” solar panel. The battery is good enough to power the light for 31.5 hours in low and 7.5 hour in high modes. You can also plug a smartphone into the battery and it acts as an auxiliary charger.

shine-system

The system has countless applications. It makes an amazing camping light or light for an off-grid cabin or for some spot in your home far from an outlet. But perhaps Shine’s best applications are in less ideal scenarios, such as emergencies like Hurricanes when power goes out. It can also be indispensible for the 1.3 billion people across the globe that live without access to electricity in their homes, many of whom rely on hazardous substances such as biomass to light their homes. The World Bank estimates that 780 million women and children inhale smoke which is the equivalent to smoking two packs of cigarettes every day from the smoke from these substances create when burned. Voltaic Solaire has partnered up with the nonprofit Fabretto to deliver their lights to several regions of Nicaragua who fall into this category.

Shine seems to be a hit, evidenced by the fact that it met its funding goals about a day after their campaign launched. For a pledge of $39 you get the light itself; for $66 you get the light and solar charger; and for $109 you can get the light, solar charger and Voltaic will send a system to a Nicaraguan family in need (there are other pledge amounts as well). Units are expected to ship January 2016. Even if you don’t have an altruistic bone in your body, the Shine is an awesome, perhaps indispensable item to have around. As they say in their campaign, “Useful everyday, essential one day.” Visit their Kickstarter page to pick one up or for more info.

It’s Going to be a Bright, Bright Sun Shiny Day…No Matter the Weather

Getting adequate light is one of the biggest challenges of living in an apartment, especially in densely populated cities like NYC and SF where buildings block out one another’s light. In any given building, there are going to be units with crummy lighting: first floor apartments whose light is shielded by neighboring buildings, apartments that look out into sunless shafts, apartments with few windows. This situation can turn a nicely-laid-out space into a dungeon-esque hole. But the days of relying on architecture and the good fortune of landing a nicely lit apartment might be coming to a close. A concept LED panel developed by Paolo di Trapani and a team from the University of Insubria in Italy called CoeLux can perfectly replicate a cloudless sky with the help of nano-particles.

The panels actually mimic the chemistry of the sky as Gizmodo reports:

What the panel is actually imitating is the Earth’s atmosphere, a special cocktail of nitrogen, oxygen, and assorted other gases that makes our sky appear blue. Using a white LED behind a polymer screen that is coated in titanium dioxide nanoparticles, the window is able to reproduce Rayleigh scattering—the process that separates light particles into “blue” sky and “yellow” sun for our eyes.

The panels have three angles of light depending on the quality you want: CoeLux 60 for tropical light that hits more directly; CoeLux 45 for Mediterranean light that’s less direct and CoeLux 30 for “lateral,” Nordic light. Incredibly, the pictures you see here are real and untouched.

coelux-45

No word on the market availability of CoeLux, but it seems like they’re serious about bringing it to market. It might not be long before we’re all sitting in sunny, basement rooms on cloudy days. Though they don’t mention it on their site, we suspect you’ll soon be able to program whatever weather condition and view you want on your CoeLux “window.” Do you live in Milwaukee and want a partially cloudy day with a view of the Eiffel Tower? No problem.

CoeLux suggests other applications. They say the panels would provide relief for places like Beijing that are often shrouded in smog. This prospect seems like putting icing on mud pie–a way to avoid the consequences of poor environmental control. But what do we know?

The bigger question may be whether we should replicate nature in the first place. Would it screw up our natural biorhythms? What if the power cuts out…would we just be stuck in an unlit space? Isn’t it just kinda strange? While we don’t know the answers to any of these questions, it does bring to mind futurist Stewart Brand’s famous statement, “We are as gods and have to get good at it.” In other words, we already manipulate nature in countless ways, why not avail ourselves of technology that can make our living environments much more pleasant? What do you think?

Solar Power in LifeEdited Apartment by Voltaic Systems

In the coming months, we will be highlighting products and services we use in the LifeEdited apartment. Today, we’re looking at our solar powered lighting and charging system by a company normally known for their portable solar chargers, Voltaic Systems. This post originally appeared in Votaic’s Blog

We have been working for some time on our latest product, the USB Touchlight. This is a super bright, USB-powered LED light, designed to run from our solar batteries.

When our good friends at LifeEdited asked us to set up a mini solar system for their innovative 420 square foot New York apartment, we jumped at the chance to put the Touchlight into action. We installed a 13 watt solar system discretely mounted on a ledge outside the apartment, feeding two of our V39 USB batteries with enough power to feed an iPad, phone, a couple of our Touchlights, and other USB devices. It proved invaluable recently when the apartment was blacked out during hurricane Sandy.

Many of our customers are interested in using our kits for similar applications and have asked about installation.

Here is how we did it. We essentially used 2 of our 6.8-W kits:

1 x Touchlight
4 x 3.4W 6V solar panels
2 x V39 39-Wh batteries
1 x 4-panel 6V/12V circuit box
1 x panel extension cable
Various connectors
1” aluminum strip

Panels: Being a New York City apartment, outdoor space was limited to a small ledge of metal flashing below the window sill about 5” wide. We configured our 3.4W panels end-to-end longways so they would fit. We opted to use four panels because the light exposure is pretty limited, only about 2-3 hours of direct light per day.

Given that our panels come with threaded bolts for mounting, we used two long strips of 1” wide 1/4″ aluminum as the foundation. We lined up the panels and marked off the locations for holes on the first strip, then drilled 1/2” holes (big enough for the nylon nuts to sit inside).

After attaching the panels to the first strip we repeated the process for the other side to get two strips holding all four panels in place.

We could have just secured the strips directly to a substrate, however we didn’t want to screw into the flashing (since that would undermine its waterproofing), so we took the additional step of attaching two strips of aluminum U-channel (3/4” each side) which provided a flat even surface to secure to the flashing with silicone. This created a space under the panels for the circuit box and wires, reduced the likelihood of water backing up, and makes it easy for us to remove the panels for service without having to cut the silicone connection. The U-channels were cut to length and attached with self-tapping screws to the 1” strips.

Panel Installation: With that done, we were ready to install the solar array on-site. We hacked one of our 4 panel circuit boxes, and attached the output wire to some electrical wire. We then fed the wire into the apartment through an existing hole in the window frame. Our 2 panel circuit boxes could be used here (with two 6.8W kits), but the 4 panel option was cleaner.

We then connected each panel to the input of the circuit box (having checked that each panel worked individually and provided an output to a battery). We then used small sections of silicon tubing to waterproof the connections. All of this fit nicely behind the panels inside the frame.

From there, it was just a matter of actually securing the rig to the flashing. We applied a thick bead of exterior silicon to both of the U-channels, secured a wire safety line to catch the rig in case it came loose, and pressed it into place. We then added some strips of masking tape to keep it in place while the silicon dried.


Batteries: We decided to run the four panels to the two V39 batteries wired in parallel, so that one wire from the panels was split to go to both batteries. That way, whatever power was generated by the panels would go to whichever battery could absorb it. From there we would run wires to the lights. We hacked a couple of our 3 or 4 panel circuit boxes to get 5.5×2.1mm male plugs and joined these to the copper wire we had fed through the window frame. This could as easily be done with the “power out” wires from our 2 panel circuit box and a 5.5×2.1mm adapter. We connected the plugs to the batteries and saw the LEDs on the batteries light up indicating they were charging and the circuit was good. The Life Edited carpenter later made a custom nook for our batteries inside the closet by the bed, which seemed the right place for charging a phone or tablet.


Lighting: The walls were open so we had the opportunity to run the wire to our Touchlight to the ceiling over the bed. We hadn’t really contemplated this sort of installation in the design, but it was not too difficult to pull together some parts from the lighting store to make a mount for the plug. We tied a knot in the end of the wire, fed it through a threaded rod, and held it in place with silicone inside the rod. Then we screwed the rod into a bracket also from the lighting store. There are many ways this could have been done, including a simple hole through the ceiling with the wire coming through. In this case we wanted the threaded rod so we have the option of removing the light and wire (the moveable wall in the apartment is very close to the ceiling), and of mounting a more complicated hanging light fitting. To test, we made the connection with one of our adapters (3.5×1.1mm to 3.5×1.1mm)


Thanks to LifeEdited for inviting us to contribute to their ultra-efficient living space. It was a lot of fun and is a great example of how solar can be implemented on a small scale in even the most space-limited locations.